LookAway
 LookAway
Search System Settings for an eye protection mode and you will not find one. macOS simply does not use that name.
The useful controls are there, though. Night Shift changes the color temperature, True Tone adjusts the display to the room, automatic brightness keeps the screen from overpowering its surroundings, and the accessibility settings can make text easier to read. Apple has just put them in different places.
This guide shows where each setting lives and what it is actually useful for. It also covers the part no display setting can handle: giving your eyes a break from close focus.
Why You Can't Find Eye Protection Mode on Your Mac
There is no single "eye protection mode" or "eye comfort mode" in macOS. It is not hidden behind an advanced menu, and searching for either phrase will not bring up a master switch.
That feels unusual if you have come from another platform:
- Android phones use names such as "Eye comfort shield" on Samsung devices and "Eye protection mode" on Xiaomi and Huawei devices.
- Windows PCs call the equivalent color setting "Night light."
- iPhones and iPads put Night Shift in Control Center.
- Many monitors and TVs include a "low blue light" or "eye saver" preset.
On a Mac, the closest equivalent is Night Shift. It warms the display on a schedule, much like Android's eye comfort modes. Brightness, contrast, text size, and reflections are handled separately.
It is also worth being clear about what the label promises. An eye protection mode sounds as if it protects your eyes by filtering a harmful part of the screen. That is not how digital eye strain usually works. The American Academy of Ophthalmology points instead to reduced blinking, long periods of close focus, glare, and viewing distance. A color filter can make a screen more comfortable at night, but it cannot solve those problems by itself.
Every "Eye Protection" Setting in macOS (and How to Turn It On)
You can think of the settings below as the pieces of a manual eye protection mode. None takes long to set up. Together, they are the closest thing to eye protection mode on a Mac.
Night Shift: The Closest Thing to Eye Protection Mode
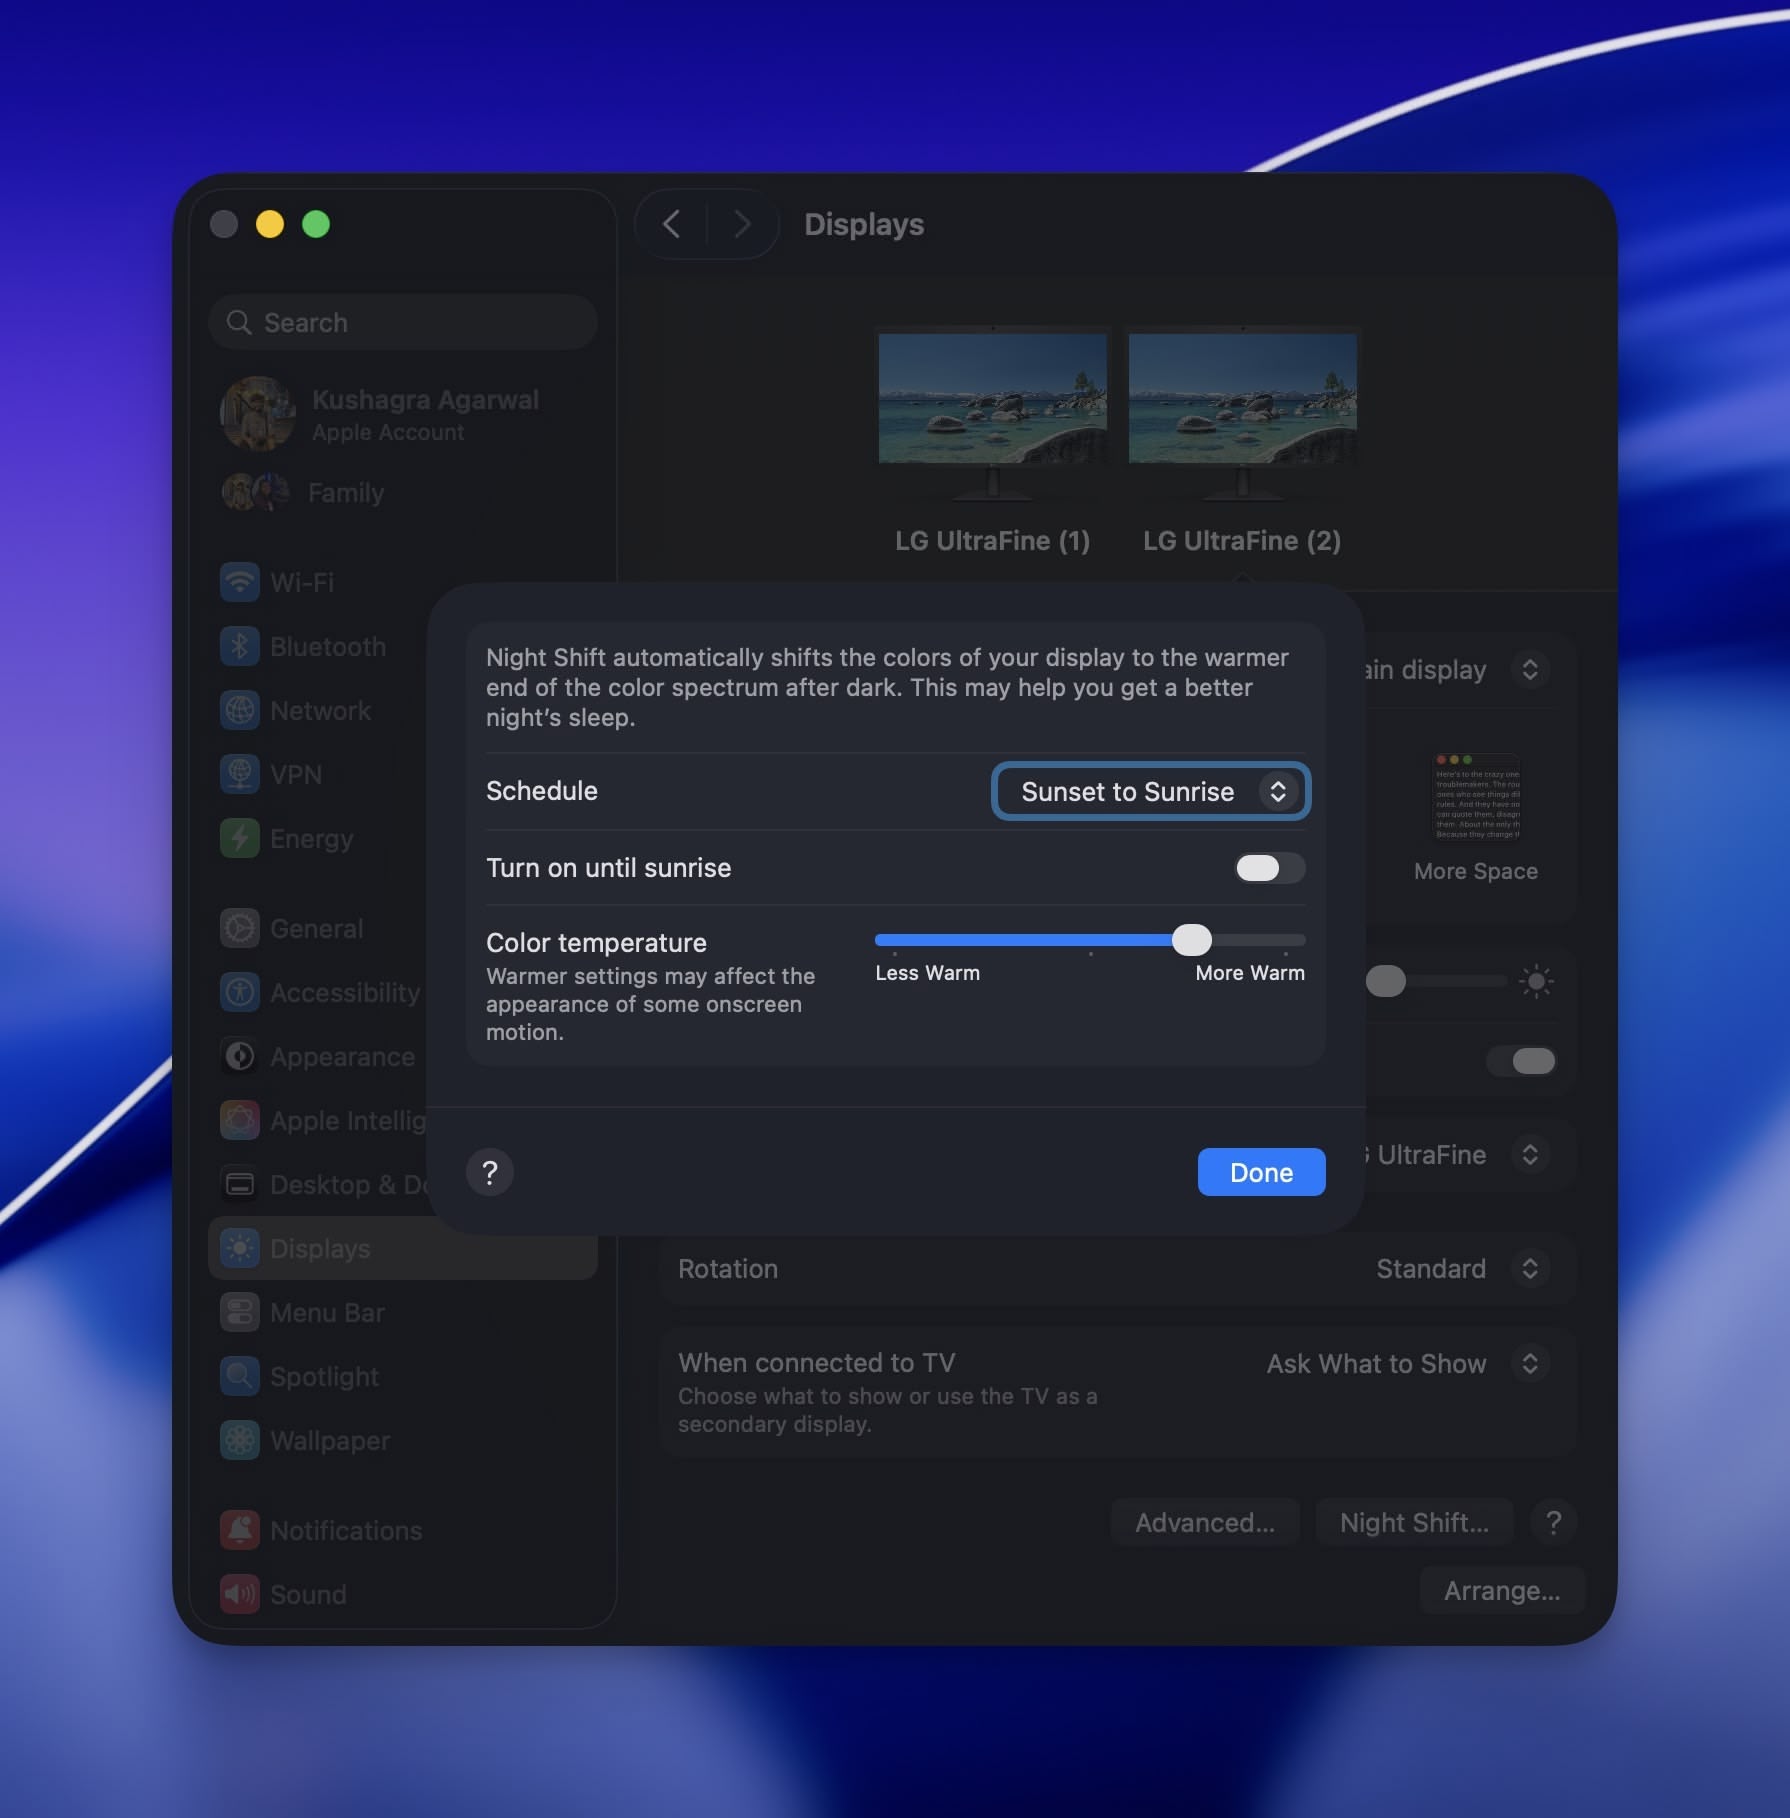
Night Shift moves the display toward a warmer color temperature and reduces the blue light it emits. This is the feature other platforms usually call "eye protection" or "night light."
To turn it on:
- Open System Settings > Displays.
- Click Night Shift… at the bottom.
- Set Schedule to Sunset to Sunrise, or choose a custom schedule such as 7 PM to 7 AM.
- Move the Color Temperature slider toward More Warm until the display feels comfortable.
For a one-off evening session, open Control Center from the menu bar, expand Display, and switch on Night Shift. macOS will leave it on until the following morning.
Set the warmth by feel. A stronger setting is often easier on the eyes late at night, but it also changes how colors look. Turn it off while editing photos, grading video, or doing any other color-sensitive work. For schedules, the True Tone comparison, and fixes when it does not turn on, see our full guide to Night Shift on Mac.
True Tone: Automatic Color Adjustment
True Tone uses the Mac's ambient light sensor to adjust the display's white balance to the room. Under warm indoor lighting, the screen becomes warmer too, so a white page does not look starkly blue beside everything around it.
The switch is under System Settings > Displays > True Tone. It is available on MacBook models from 2018 onward and on Apple's external displays. It is fine to leave on for everyday work; turn it off when you need reference-accurate color.
Automatically Adjust Brightness: The Most Underrated Setting
A bright display in a dark room can feel harsh, while a dim display in daylight makes you squint. Automatic brightness handles that mismatch throughout the day.
- Open System Settings > Displays.
- Turn on Automatically adjust brightness.
The ambient light sensor will now raise or lower the display brightness as the room changes. You can still adjust it manually whenever the automatic level feels wrong.
Dark Mode: Helpful in the Right Lighting
Dark Mode reduces the overall amount of light coming from the interface, which can be comfortable in a dim room. Turn it on under System Settings > Appearance, or choose Auto to switch after sunset.
It is not always the easier option. In bright conditions, most people find dark text on a light background easier to read, and some find light text on a dark background more tiring. Our guide to whether dark mode is better for your eyes covers the research in more detail. A practical rule is to use it in low light and keep light mode for daylight.
Accessibility Settings: Bigger Text, Less Squinting
If you keep leaning toward the screen, the answer may be as simple as larger text or stronger contrast. macOS collects these controls under System Settings > Accessibility > Display:
| Setting | Where to find it | What it does for your eyes |
|---|---|---|
| Text size | Accessibility > Display > Text | Makes system text larger, so you do not have to lean in or squint. |
| Increase contrast | Accessibility > Display | Separates text and controls more clearly from their backgrounds. |
| Reduce transparency | Accessibility > Display | Replaces translucent surfaces with solid, easier-to-read backgrounds. |
The iPhone and iPad also have a Reduce White Point setting, but macOS does not. If your Mac still feels too bright at its lowest setting, combine Dark Mode with a warmer Night Shift setting. Going below the built-in minimum brightness requires a third-party utility.
Don't Forget the Physical Stuff
Software cannot fix the position of your display or the window reflected in it. Keep the top edge at or just below eye level, about 20–26 inches from your face, and turn the screen away from strong windows or lights. A glossy Mac display looks excellent until it starts behaving like a mirror.
Our Mac user's guide to reducing eye strain goes further into desk height, lighting, posture, and monitor position.
What These Settings Actually Do (and Don't Do)
Blue light is usually presented as the reason screens make your eyes hurt. The evidence is less dramatic. The American Academy of Ophthalmology says blue light from screens does not damage the eyes. A 2023 Cochrane review of 17 clinical trials also found no clear evidence that blue-light-filtering lenses reduce computer eye strain. We cover that research in more detail in do blue light glasses actually work.
The familiar dry, tired feeling usually has more ordinary causes:
- You blink less. Concentrating on a screen can reduce your blink rate by as much as 66%. Tears evaporate faster, leaving the eyes dry, gritty, or sore.
- Your eyes stay focused at one distance. Hours of close work give the focusing muscles very little chance to relax. The result can be aching, heaviness, or temporary blur.
- The screen and room do not match. Reflections and a display that is much brighter or dimmer than its surroundings make viewing less comfortable.
The macOS settings help with parts of this. Automatic brightness reduces the mismatch between the screen and the room. Larger text and higher contrast make reading easier. Night Shift is most useful in the evening: blue light can suppress melatonin and shift the body clock, so a warmer display may interfere less with sleep.
What these settings cannot do is make you blink or look into the distance. That is why switching on every eye protection mode feature can still leave you with tired eyes at the end of the day.
The Real Eye Protection Mode Is Taking Breaks
For screen work, eye doctors commonly recommend the 20-20-20 rule:
- Every 20 minutes of screen time,
- look at something 20 feet away
- for at least 20 seconds.
Looking into the distance gives the focusing muscles a short rest and usually prompts a few full blinks as well. The American Optometric Association includes the rule in its advice for computer vision syndrome.
The difficult part is not understanding the rule. It is remembering it while you are working. That is the reason I built LookAway: to cover the part of eye protection mode that macOS leaves to you.
At an interval you choose, LookAway dims and blurs the screen after a short countdown. You look away for the break, then return to exactly what you were doing.
It also avoids the moments when a reminder would be disruptive:
LookAway can hold a break while you are in a meeting, watching a video, or using an excluded app, then resume the schedule afterward. Separate reminders can prompt you to blink, adjust your posture, or drink water.

The eye protection mode your Mac is missing
LookAway reminds you to rest your eyes, blink, and fix your posture, and it stays out of the way during meetings and deep focus. Pay once, use forever.
If you want to compare the alternatives, our guide to the best break reminder apps for Mac includes both paid and free options.
Common Questions About Eye Protection on Mac
Does the Mac have a built-in blue light filter?
Yes. It is called Night Shift, and you will find it under System Settings > Displays. It warms the display on a schedule, much like the "eye protection" and "night light" modes on other platforms. At night, you can combine it with Dark Mode and a warmer color-temperature setting.
Is there an eye protection app for Mac?
There are two main types. Screen-tinting apps such as f.lux offer more control over the job Night Shift already does. Break reminder apps such as LookAway handle what macOS does not: reminding you to look into the distance regularly, blink, and give your eyes a rest.
Does Night Shift really reduce eye strain?
Its clearest benefit is at night, when reducing blue light exposure can be better for sleep. Many people also find a warmer screen more comfortable in the evening. Color filtering on its own has not been shown to prevent eye strain, though. Breaks, blinking, appropriate brightness, and a comfortable setup matter more.
My eyes still hurt after changing every setting. Should I worry?
If regular breaks and a more comfortable setup have not helped after a week or two, make an appointment with an optometrist. Seek advice sooner for double vision, sudden blurriness, or severe headaches. An uncorrected vision problem or dry eye condition needs more than a settings change. Digital eye strain itself is temporary and doesn't cause permanent damage.
Conclusion
Your Mac has no setting named eye protection mode, but you can cover most of the same ground in a few minutes. Use Night Shift in the evening, leave True Tone and Automatically adjust brightness on for everyday work, increase the text size and contrast if you find yourself squinting, and use Dark Mode when the room is dim.
Then deal with the part the display cannot change: how long you stare at it. The 20-20-20 rule gives your eyes a regular chance to refocus and blink. If you tend to forget, download LookAway and let your Mac remember for you.
Try LookAway
LookAway is a smart break reminder that helps reduce eye strain, digital fatigue, and maintain better posture - so you can end your day feeling fresh.